Plasma CNC
Contents
Summary
Build a large sized XY CNC table capable of using a plasma torch to accurately cut metal.
- Project lead: Toby
- Team:
- Location: Metalspace
- Status: Design phase
Help wanted: electronics, cad, frame
Equipment
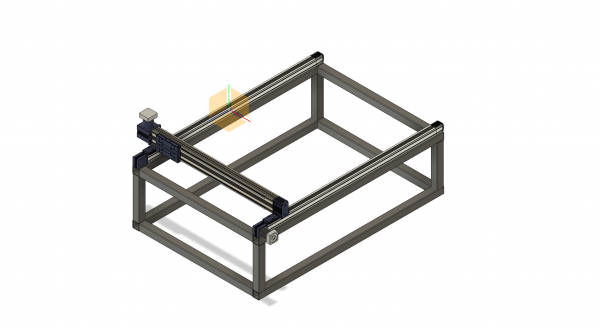
- 2x Y-axis 2m Rollon ELM65 enclosed linear rail
- 1x X-axis Rollon ROBOT130 X gantry
- 2x Servo motors 86HSE8N-BC38
- 2x HSS86 servo motor drivers
- 2x bonfiglioli MP 080 planetary gearboxes
- A crappy steel frame
The Rollon rails are very high quality industrial components that are sealed to dust. The Y axis rails use toothed belts inside the rail and the X axis used ball screws and twin linear rails. The motors are large high powered units with encoders that measure the actual movement and sends it back to the driver. This closed loop setup means that the driver can compensate for any missed step allowing for finer microstepping and increased reliability.
Docs
Hardware
Frame
The frame must be as rigid as practically possible whilst still portable.
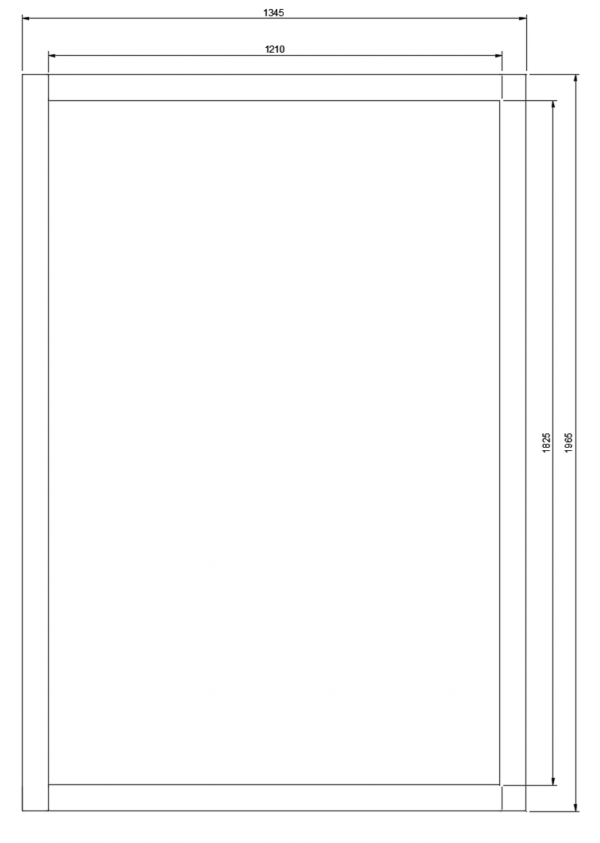
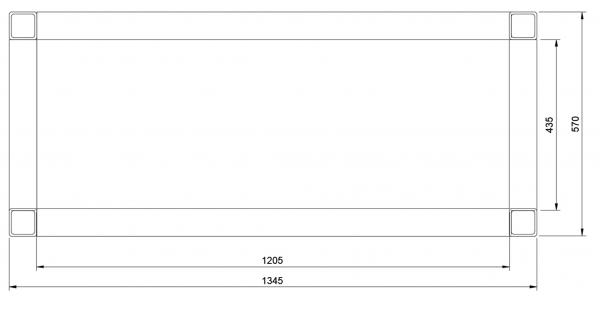
Plan A - 40mm box steel, 5mm wall thickness Rectangle: 1345mm x 1825mm For additional stiffness two such rectangles could be stacked and braced.
Top
 This was a suggestion to increase stiffness at reduced cost
Plan B - Use 60mm I-beam for y rails
MP 080 gearbox
MP 080 2 70 STD 73A1 CD 14 S1 OR SB KE
MP - range 080 - model/frame size 2 - reduction 70 - gear ratio STD - Backlash (standard = 15') 73A1- input shaft CD - motor couping (CD - clamping device) 14 - input shaft bore S1 - duty (S1 = continuous) OR - position (OR = horizontal) SB - Output shaft bearings (SB = standard) KE - Output shaft config (KE - keyed shaft)
HSS86 servo motor drivers
86HSE8N-BC38 Servo motors
Rollon ELM65
Uses AT5 32mm steel reinforced polyurethane belt AT5 refers to the tooth spacing of 5mm
Rollon ROBOT130
Software
Looking at the HSS86 datasheet it appear to work just like standard polou steppers that take a ENABLE, DIR & STEP signal input. Therefore a GRBL based controller should be ideal for driving the CNC.
I have successfully driven one of the motors using a basic arduino sketch to send pulse and dir signals. Setting the signals high +5 volts with a common ground did not work. The datasheet for HSS86 shows a common 5v with a on signal represented as pin output low. This requirement means that GRBL is not working and need to configure GRBL to invert the high/low signals.
Progress
18-8-2021
Gave up on farbricator and decided to try and make it myself. Bought 10m of 60x60x5mm box steel Cut into lengths of 2m and 1.5m. Drilled a set of holes along the length of each Y section. Way over did this as i drilled 5 holes in a sqare pattern every 100mm. The could have easily been reduced.
Used a thick metal square to make a larger 90 deg square from the 60mm box. Could then use both squares on internal and external corners. With many clamps and the three point support method I got the frame pretty square. Made some rudamentary plates to link the rails to the frame
18-03-2021
CAD drawing of basic frame done and quotes sent to Eastern steel and oak street fab
11-10-2020
Starting the frame by drawing it out in fusion360, using this tutorial as a https://www.youtube.com/watch?v=AH3QWscviBc Aim to calculate what steel is needed to purchase and use the model to make it as strong as possible.
note: box tube fillets (curves on edges) are:
- External radius = 1.5t
- Internal radius = 1.0t
(where t = wall thickness)
04-10-2020 - LESSON LEARNT! do not run into the endstops
It turned out the test of running into the endstop was catastrophic as it snapped the drive side Y axis belt. This was discovered by removing the black dust strip to see the belt bunched up inside. I could also move the mount plate without the drive motor turning.
We (toby & alan) took apart the Y rail starting with the drive motor side and could see that the belt had cleanly snapped where it connects to the mount plate. The belt is held down into a toothed metal connector so we moved both sides down by 3 teeth, so that the belt is effectively held by half the original amount of belt. Far from ideal and will be replaced but should hold for now.
Upon reassembling, I realised the black dust strip has to be bolted into the rail end plate before assembly otherwise you dont have access to the nuts underneath. The drive side needs to be attached first to be able to get the belt round the drive pulley.
The belt is Megadyne 32 AT5
27-09-2020 - Y axis
Given the success of running the X axis, I wanted to check the movement of the Y axis and so bolted the Y rails to the frame and the X gantry to the Y rails. I took some extra time to align the rails and added a 10mm spacer block of steel under then ends of the Y rail for support.
Both Y rails moved well if a bit slowly. The torque seems huge as I cannot even begin to slow down the drive by hand. I also did a test to see if the encoders would detect the rails being run into the end stop. They didn't.
20-09-2020 - GRBL works
The simple sketch showed it was possible to drive the HSS86 from an Arduino so it must be possible to get GRBL working if it can be configured to output the correct signals. The default is for the output pin to be HIGH when on. Due to the wiring of the HSS86 we now need to pull the pin LOW to indicate on. Therefore the output signals for GRBL also need to be inverted so that LOW is on rather than high.
GBBL has a numbered config array that is stored on flash memory on the Arduino. The docs indicates that $2 controls "Step Pulse Configuration" and will invert any of the axis according to a bit mask.
$2=7 will invert all the axis
Once I had set this value and fixed a wiring mistake the X gantry moved using GRBL by sending Gcode over the serial monitor. It also followed the acceleration curves set by GRBL and was smoother than the simple sketch.
WOOT WOOT - this means all of the required functionality will work via GRBL
I also spent some time dialing in the steps per mm setting ($100) so that it would move the correct amount according to the steps sent. Ideally I would calculate this but I don't know the rollon specs or the planetary gearbox specs. Using a round guess I got it close with $100=300 but will need a dial indicator to improve further. It also might be possible to find the numbers in the Rollon docs.
12-09-2020 - Simple test sketch
The datasheet for the HSS86 shows that all the +5v pins should be connected and the signal pins pulled low.
This makes no sense especially as the previous owner had also wired ground together but seemed to be worth trying. I had some very useful discussion on slack and was suggested that GRBL was not good to test with as its pretty complicated with lots to go wrong. I switched to a much simpler sketch that essentially just set the output pins. I used the same pinouts that GRBL uses for the X axis (2,5,8).
const int stepPin = 2; //white
const int dirPin = 5; //black
const int enPin = 8; //red
char data;
float step_delay_time = 500;

void setup() {
  pinMode(stepPin, OUTPUT);
  pinMode(dirPin, OUTPUT);
  pinMode(enPin, OUTPUT);

  digitalWrite(enPin, HIGH);
  Serial.begin(115200);
}

void loop() {
  if (Serial.available() > 0) // we give commands through serial monitor
  {
    data = Serial.read(); //command from monitor
    if (data == 'a') //stepper 1 right
    {
      digitalWrite(enPin, HIGH);
      digitalWrite(dirPin, HIGH); //motor will rotate write
      for (int x = 0; x < 500; x++)
      {
        digitalWrite(stepPin, LOW);
        delayMicroseconds(step_delay_time);
        digitalWrite(stepPin, HIGH);
        delayMicroseconds(step_delay_time);

        Serial.println(x);
        if (Serial.read() == 'x') //to stop
        {
          digitalWrite(enPin, HIGH);
          Serial.print("stop");
          break;
        }
      }
    }
}
Much to my surprise and pleasure this worked.
09-09-2020 - Test drive #1
The plan is to feed the HSS86 driver with the same signals as standard stepper motors. This is to send +5v to the STEP, DIR and ENABLE pins and have all the grounds connected together. I GRBL to send the pulses with universal gcode sender. After a few hours of fiddling nothing worked.


