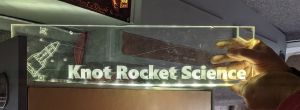
Lasercut Illuminated Acrylic sign
Engraving acrylic and then lighting the edge with LEDs will allow the light to break out of the acrylic where it has been cut. Using Neopixels some really nice effects can be made.
Materials
- 8mm clear acrylic. Any thickness will work but its best if the thickness matches the LEDs
- Neopixel strip
- Circuit Playground microcontroller (Swap out for any LED controller)
- Wooden stand
Step 1 Create design. This can be done directly in Lightburn or in a vector program like Inkscape. Draw the outline of your sign, we chose a final size of 250mm x 500mm. To cut 8mm acrylic used power settings of 12 speed, 100% power, with 3 passes. Set the passes on the cut layer.
Text was added with a fill and line cut setting. Fill and line engraves the internal area and then flame polishes the edges. Speed 75, power 100% will engrave 3-4mm deep, faster speed (300) will give a shallower engrave.
Used google image search to find a svg file of the rocket and imported into Lightburn. Resized and set the cut layer to, speed 300, power 20% which cuts a shallow line.
Set the order of the layers so the layer to cutout the sign is last. This is so there is no chance of the sign moving while engraving.
