Difference between revisions of "How to prepare 3d models for the D7"
Nicholas w (talk | contribs) (Created page with "The D7 is undoubtedly powered by magic, but it cannot do 90° angled 'bridges' or ... negative overhangs. Your model needs to allow some kind of gradient. The dinosaur only ne...") |
Nicholas w (talk | contribs) |
||
| Line 1: | Line 1: | ||
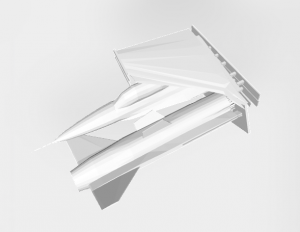
The D7 is undoubtedly powered by magic, but it cannot do 90° angled 'bridges' or ... negative overhangs. Your model needs to allow some kind of gradient. The dinosaur only needed a support 'channel' to the negative overhangs, which was strong enough to physically support them until the 'bridge' was connected. The F16 was cut into pieces to fit into the space, but also had to not have overhangs. The wings base is at an angle to the 'floor'. | The D7 is undoubtedly powered by magic, but it cannot do 90° angled 'bridges' or ... negative overhangs. Your model needs to allow some kind of gradient. The dinosaur only needed a support 'channel' to the negative overhangs, which was strong enough to physically support them until the 'bridge' was connected. The F16 was cut into pieces to fit into the space, but also had to not have overhangs. The wings base is at an angle to the 'floor'. | ||
| + | |||
| + | all models aught to be raised from the 'print floor' (and should have a plate of 1mm(?) to enable them to suck to the build plate). If you keep a cube 'flat' aligned to the floor, it will look melted. This is because the model must 'grow' at 90°, which it cannot. The outstretched, ultra-thin wafer-layer bends, and new material re-inforces that bend. . Aligning your models at 45° in BOTH dimensions (at an angle and .. also at an angle...) gets around that problem. But, The layers ARE visible on the D7, if tiny, so you can see a 'grain'. These are just the facts of life. | ||
[[File:D7 model prep dinosaur.png|thumb|right|d7 model prep dinosaur]] | [[File:D7 model prep dinosaur.png|thumb|right|d7 model prep dinosaur]] | ||
[[File:D7 model prep f16.png|thumb|right|d7 model prep f16]] | [[File:D7 model prep f16.png|thumb|right|d7 model prep f16]] | ||
| + | [[File:D7-how-to-position-models.png|thumb|left|d7 how to position models on the build plate]] | ||
Revision as of 21:27, 20 September 2020
The D7 is undoubtedly powered by magic, but it cannot do 90° angled 'bridges' or ... negative overhangs. Your model needs to allow some kind of gradient. The dinosaur only needed a support 'channel' to the negative overhangs, which was strong enough to physically support them until the 'bridge' was connected. The F16 was cut into pieces to fit into the space, but also had to not have overhangs. The wings base is at an angle to the 'floor'.
all models aught to be raised from the 'print floor' (and should have a plate of 1mm(?) to enable them to suck to the build plate). If you keep a cube 'flat' aligned to the floor, it will look melted. This is because the model must 'grow' at 90°, which it cannot. The outstretched, ultra-thin wafer-layer bends, and new material re-inforces that bend. . Aligning your models at 45° in BOTH dimensions (at an angle and .. also at an angle...) gets around that problem. But, The layers ARE visible on the D7, if tiny, so you can see a 'grain'. These are just the facts of life.


