Difference between revisions of "Emco Bandsaw"
| Line 68: | Line 68: | ||
Loosening the belt tension to fit the belt can make the process easier, and the belt tension should be checked and adjusted prior to bandsaw use. (See manual page 8) | Loosening the belt tension to fit the belt can make the process easier, and the belt tension should be checked and adjusted prior to bandsaw use. (See manual page 8) | ||
| − | |||
| − | |||
| − | |||
{| class="wikitable" | {| class="wikitable" | ||
| Line 94: | Line 91: | ||
Bandsaw open.jpg|Bandsaw wheel locations | Bandsaw open.jpg|Bandsaw wheel locations | ||
BeltPosition.jpg|Position of belt on bandsaw wheels. Note that wheels have multiple belt grooves, and position A is a groove seemingly level with the bandsaw blade | BeltPosition.jpg|Position of belt on bandsaw wheels. Note that wheels have multiple belt grooves, and position A is a groove seemingly level with the bandsaw blade | ||
| + | EMCOManual8.jpg|Adjusting bandsaw drive belt tension | ||
</gallery> | </gallery> | ||
<br> | <br> | ||
| Line 124: | Line 122: | ||
Check that the blade speed is appropriate for the material <br> | Check that the blade speed is appropriate for the material <br> | ||
Go through the cut more slowly <br> | Go through the cut more slowly <br> | ||
| − | + | Support the fibres at the bottom of the wood - this can be done with a sacrificial piece of waste wood at the bottom of the piece, or by replacing the bandsaw insert with one which has less space around the blade (we do not have any spares, so this would need to be made or bought) | |
| + | |||
| + | === General === | ||
| + | |||
| + | The manual is stored next to the bandsaw (and there are links to the digital version at the top of this wiki entry). It is a great source of information, as are other Hackspace members, most of whom are happy to help and share any knowledge and experience. Googling issues can be helpful. | ||
| + | |||
| + | Bandsaws are powerful, and can cause serious injuries, especially when used improperly. There are push sticks for the tablesaw that can be used to keep hands away from the blade. Remember to use your best judgement and pause to research/ ask questions/ get instruction if you are unsure. | ||
Revision as of 20:15, 5 May 2023
ORANGE equipment: Assess your own competence after reviewing available information
Model: Emco BS-3
Blade 83.5" 1/2" wide 12TPI
Note - this is a wide blade, and is best for straight cuts. Equivalent to 12.5mm.
Supplier: Norfolk Saw Services
The bandsaw can be used for wood and plastic, but moves too fast to cut metals.
Always use dust extraction


File:Emco-bandsaw-manual-small-1.pdf
File:Emco-bandsaw-manual-small-2.pdf
Contents
Hints and Tips
Table Tilt
The bandsaw table can tilt up to 45 degrees.
To use this feature, loosen the M8 nut handle (newly 3d printed after the loss of the original), and use both hands to gently rotate the table.
Ensure that the two U-shaped metal spacers are parallel, and that the semi-circular frameis sitting within the grooves of the black support pins.
Tighten the M8 nut to secure.
Make sure to set the table back to 90 degrees after use, so it is ready for the next person to use.
Location of Table Tilt Nut
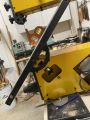
Table Tilted to 45 degrees
EMCO table tilt securing U-Shaped spacers & semi-circular support
EMCO_Table_Set_90_degrees


Troubleshooting
Remember that the table needs to be set at an angle relative to the blade, as this will determine the angle of the cut on the work
The table will be hard to turn if the semi-circular frame is not sitting in the black support pins, or if the pins are full of sawdust
The table will not be steady if the U-shaped spacers are not supporting the front and the back of the table - the bottom one can slide towards the back of the machine, so check that the spacer ends are supported at both ends
Opening up the Bandsaw
The upper and lower yellow metal plates should lift slightly, then be able to be pulled away. However, many of the black plastic pegs securing the fronts have broken. These will be replaced at some point, but there is currently a small amount of tape providing extra security until this is done. Remove the tape first, and take care when removing the plates to preserve the remaining pegs.
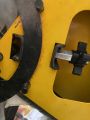
The central black metal plate. This small square plate sometimes needs to be removed for bandsaw speed reduction, and always needs to be removed to change the bandsaw blade. After removing the yellow plates, slide the black plate upwards slightly and sharply, and pull away from the machine body
It can be dangerous to run the bandsaw while the front panels are open, as if the blade breaks the broken end can flick outwards at speed. The panels protect the operator if this happens.
Bandsaw Speed
Sometimes, it is helpful to adjust the speed of the bandsaw
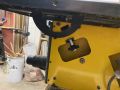
To adjust the bandsaw speed, open up all 3 panels at the front of the saw. The drive belt position can be moved to different wheels (see pictures) to adjust the speed that the blade turns.
Loosening the belt tension to fit the belt can make the process easier, and the belt tension should be checked and adjusted prior to bandsaw use. (See manual page 8)
| Material | Speed (rpm) @ 50 Hz | Speed (rpm) @ 60 H | Belt position | Bandsaw blade |
|---|---|---|---|---|
| Wood (thin items) | 1680 | 2000 | C - 2 | 6 mm wide for curve cutting with radii over 30 mm 10 111m wide for longitudinal and cross cutting, curve cutting with radii over 40 mm |
| Wood (thick items) plastics | 1050 | 1250 | B - l | 6 mm wide for curve cutting with radii over 30 mm 10 111m wide for longitudinal and cross cutting, curve cutting with radii over 40 mm |
| Steel ( iron) | 210 | 250 | A - Lower Bandsaw Roller | 5 mm wide, 24 teeth/ inch |
| Non—ferrous metals ( aluminium , brass. ) | 1050 | 1250 | B - l | 6 mm wide, tooth spacing 4 |
Note Bandsaw blades provided by the hackspace are 12.5mm wide.
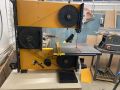
Bandsaw wheel locations
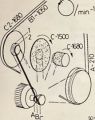
Position of belt on bandsaw wheels. Note that wheels have multiple belt grooves, and position A is a groove seemingly level with the bandsaw blade
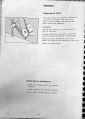
Adjusting bandsaw drive belt tension


Bandsaw Tension
Adjust by tightening or loosening the wheel on the top of the machine. Higher tension increases the amount of motor power transmitted through the blade. However, increases the chance that the blade will break, especially when making curved cuts.
Troubleshooting
Blade deflecting/ moving to the side
Check that alignment pins are clamping the blade into position appropriately (see manual page 11)
Check that the bandsaw tension is high enough - a very loose blade is more prone to deflection

Blade not cutting through material
Cause 1 - motor power not being transmitted to blade
Check that blade tension is sufficiently high (see manual page 11)
Check that motor work is being transmitted to blade through appropriately tensioned drive belt (see manual page 11) - setting the tension can be tricky, and involves closing the v-clamp closed while pulling. This means that it can be left under tensioned.
Cause 2 - wrong blade speed for the material
Check section "bandsaw speed" above, (see manual page 7), adjust speed if nessecary
Cause 2 - wrong blade for the material
Check section "bandsaw speed" above, (see manual page 7) - the hackspace only provides one blade thickness, but you could choose to acquire different blades.
There is also a smaller, Titan brand bandsaw with a different type of blade, or you could use a different piece of equipment (table saw, compound mitre saw, hand saws, etc., depending on what is appropriate for your project).
Splintering
Check that the blade speed is appropriate for the material
Go through the cut more slowly
Support the fibres at the bottom of the wood - this can be done with a sacrificial piece of waste wood at the bottom of the piece, or by replacing the bandsaw insert with one which has less space around the blade (we do not have any spares, so this would need to be made or bought)
General
The manual is stored next to the bandsaw (and there are links to the digital version at the top of this wiki entry). It is a great source of information, as are other Hackspace members, most of whom are happy to help and share any knowledge and experience. Googling issues can be helpful.
Bandsaws are powerful, and can cause serious injuries, especially when used improperly. There are push sticks for the tablesaw that can be used to keep hands away from the blade. Remember to use your best judgement and pause to research/ ask questions/ get instruction if you are unsure.